
Gardeners take your mark, get seeds, get ready, go
Are you feeling those subtle hints that gardening season is truly coming?
This month, I plan to repeat some instructions from five years ago. We have new readers and I hope new gardeners can benefit.
Seed starting! Yes! Gardeners, start your engines — finally.
You know all those seed packets you just couldn’t resist tossing in your cart in mid-winter? Well, the time has finally come for starting some.
I say “some” because all seeds are not best begun inside. Many prefer direct sowing in the garden. Here we’ll deal with those that need a head start inside where we live.
First of all, you might be asking why start seeds inside at all? You can buy perfectly grown plants at your local nursery.
The main reason to my way of thinking is to have the precise varieties you’d like. And besides, it’s fun.
Start those that take a while to germinate and become a size that can withstand outdoor wind and weather—vegetables such as eggplant, tomatoes, peppers, parsley, basil, cabbages, broccoli, leeks and lettuces.
Flowers to begin inside are perennials, mostly. Annual flowers do well with direct garden sowing.
Seeds can be held over from year to year if stored properly. That means completely dry and in a neutral temperature setting. A few kinds of seeds perform best when bought fresh each season, such as alliums and parsley.
To test for viability of saved seeds, place a few in a folded, damp paper towel and then in a jar or plastic bag. Observe for a few days and the percentage of your test seeds usually corresponds with those remaining in the packet.
Some seeds remain viable for many years. If you’d like to save seeds and have them come in true, you must save only open-pollinated varieties. Hybrids are not good candidates.
Some seeds need preparation before sowing. Peas, beans and parsley could benefit from an overnight soaking first. There is also a legume inoculant for pea and bean seeds that aids in germination.
Others need scarification, like moonflowers. This means nicking the outer coating with a sharp knife to allow moisture to penetrate the shell more easily. Then there is stratification, which means planting in moist starting mix and placing (covered) in a cool environment (like the refrigerator) for months. Cardinal flower is one that comes to mind for this treatment.

Here, think what Mother Nature would do for a hint about which could use this method.
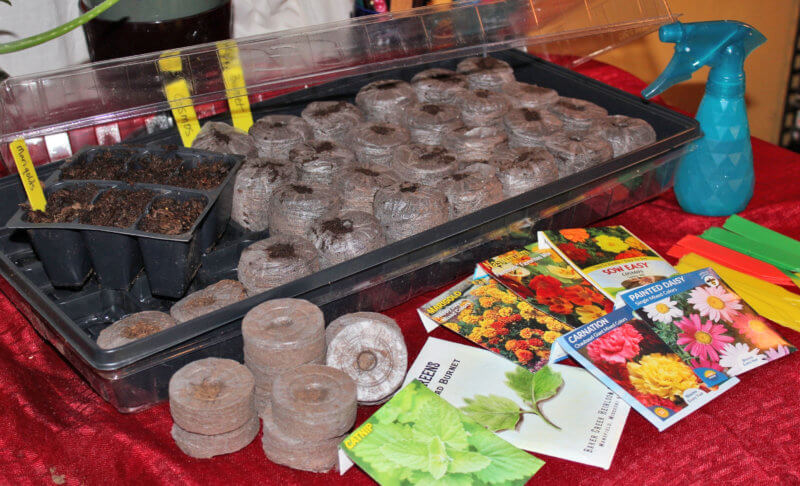
You’ll need a few supplies to begin. First, a soilless mix for filling your containers. Containers can be specially bought divided planters or old yogurt cups. Clamshell containers from salad or such make good planters and come with their own covers to hold in moisture. This should be removed once germination takes place. Depends on your budget. Drainage is important, so holes might need to be added to the bottom.
You’ll need trays to hold your choice of planters because you will want to water from below so as not to wash away your seeds. Some sort of labels are essential and a sharpie or grease pencil. I sometimes cut used cottage cheese or yogurt containers into V-shaped labels to stick in the planters.
Lighting is important, especially after germination takes place. I have used ordinary shop lights on adjustable chains with good results. You will want to raise the lights as the plants grow. If the source of light is not close enough to plants, they will reach for it and become leggy and weak.
Although somewhat expensive, a gardener’s heating pad to place under your tray will ensure success. It can be used every year thereafter, so the investment is worth it.
One reason for the early demise of seedlings is “damping off,” which will have your baby plants falling over suddenly. To avoid this, always water from the bottom, and it could benefit your plants to have a sprinkling of sand or gravel on top of the planting medium.
Lightly brushing your newly started plants daily with your hand helps them to be strong. Another idea is to run an oscillating fan nearby. A timer for your lights is also a good idea, as you will want the light to shine for 14-16 hours a day.
Once our last frost date has come and the weather warms, you will want to “harden off” your plants. They should be introduced to their permanent garden space by setting outdoors in a shaded but bright area a little bit each day and brought inside at night. After a week or so of this, you may plant in the garden.
One trick I have used to protect newly planted vegetables like tomatoes is to cut the bottom off a soft plastic pot and push it into the ground around your plant. This protects the plant from wind and shades it just enough till it gets strong. You can leave in place all season, as your plant will grow right up and out.
Don’t be too anxious to start your seeds, as you will be taking care of them for many months. Packets usually have loads of valuable information about planting depth, days to maturity, whether light is needed for germination or dark.
There are books available also. Our library has some, as well as free seeds from the seed library. It is hoped you will add some seeds at the end of the season for next year’s offerings. One of my favorite books about propagating plants is Making More Plants by Ken Druse.
Seeds for squash, beets, corn, carrots, beans, radishes, cucumbers, melons and peas are best planted directly in your garden beds when the soil temperature is warm and all danger of frost is past.
There are still many plants that our local nurseries do better than we do, so visit and purchase some starts. Knowing something about the beginnings of a plant’s life will make you a better shopper.
If you are new at seed starting, begin with a manageable few. Before you know it, you’ll catch the fever.